Feeds:
Posts
Comments

Archive for the ‘new recipe’ Category

December


I meant to post this last night, when I was doing my food prep for Week 1 of the Fit Girl’s Guide Winterwonderland Challenge, but I had a lot going on and the time escaped me.

One of the main things I really appreciate about the Fit Girls Guide is that they provide a super organized grocery list for each week, organized by area of the store. That’s how I make my own lists, so this really appeals to my OCD side.  The other thing I like is that the meal plans are developed to get the most out of each item on the list, for virtually no food waste.  As someone who throws away more food than I’d like to admit, I’m happy that I’ll be able to cut down on this.

Even though the list was really organized and clear, I still spent over an hour at Trader Joe’s.  Partially because everyone and their brother seemed to be stocking up for the work week and partially because there were a lot of items on the list.  Here’s my haul, which I tried to divide into food groups:

photo 2 (1)


I had some items in stock already, so not every single thing I’ll be eating this week is here, but it gives you an idea.

Now that I had the groceries, it was time to meal prep.

photo 5 (1) 
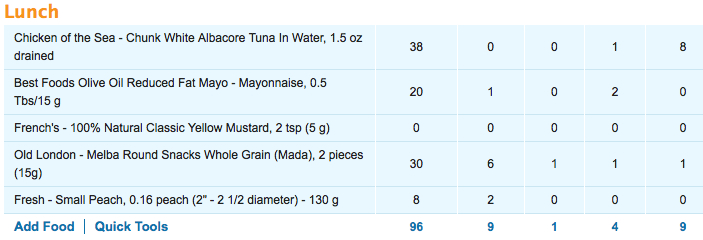
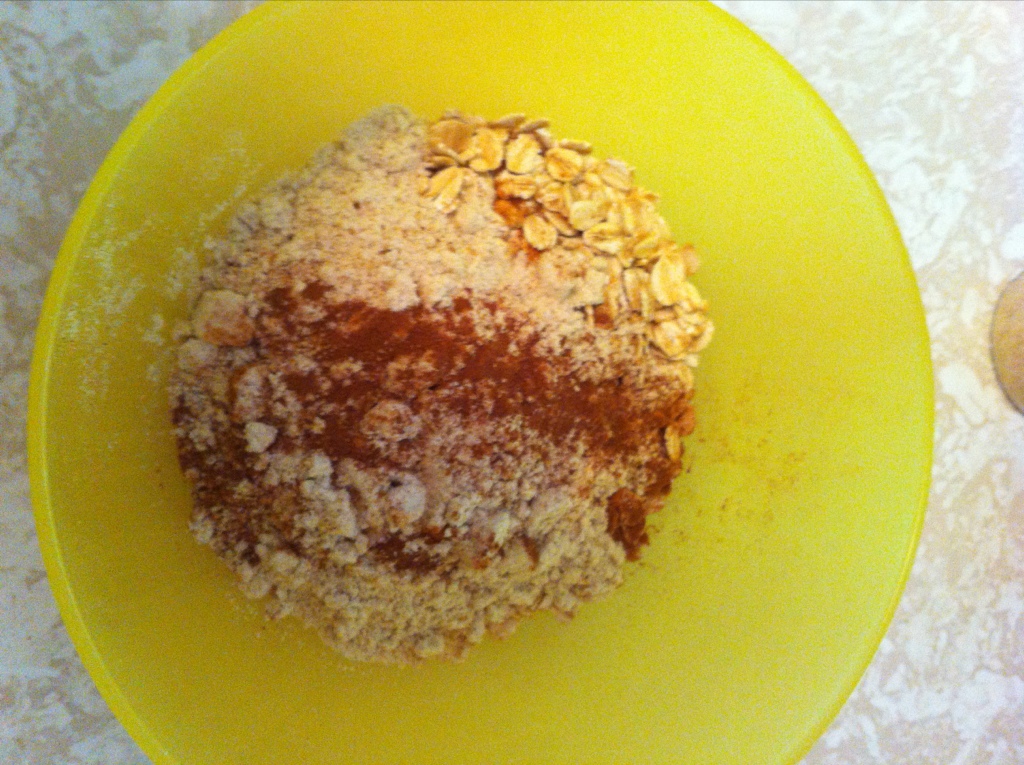
Week 1 breakfasts actually call for Cherry Pie fridge oats, but since I’m not a fan of frozen cherries, I decided to go with a mixed berry medley.  These are the overnight oats that I love.  Oatmeal, chia seeds, almond milk, almond butter, honey, Greek yogurt, and the frozen berries.  I really enjoyed these this morning and liked the not-too-sweet taste that the 1 tsp of honey added.  I usually put protein powder in my overnight oats, but this version had a really clean, hearty flavor that I preferred.  And the stats aren’t too bad, either: 285 calories, 19g protein, 36g carbs, 7g fiber, 8g fat.

Next up were the lunches – chicken & veggie power bowls.  Because I’m someone who needs variety in all things (life, exercise, food) I made sure to make a few of the suggested variations on the traditional bowl.  I also cut down the quantities to make it more post-wls friendly. Also, instead of steaming the kale, I decided to sautee it with onions, garlic, and a tiny splash of olive oil.  I’m not eating as many snacks as they suggest on the plan (because I just can’t fit that much food into my post-vsg tummy), so I figured a bit more healthy fat in my day would be just fine. Plus I know it’s going to taste fantastic. I’ve never made anything like this for lunch, so I’m excited to try them and see how I like them.

photo 4

From left to right:

Pasta Primavera Bowl: less than a cup of sauteed kale w/ onions, 2.5 oz of lemon chicken, 1/3 cup of whole wheat pasta, 1/2 roasted zucchini, 1/2 cup roasted crimini mushrooms, 2T marinara sauce, 2T mozzarella cheese.

Faux-otle Bowl: less than a cup of sauteed kale w/ onions, 2.5 oz of lemon chicken, 1/4 cup black beans, 2T mozzarella, 1 oz roasted red peppers, 1/4 cup brown rice, 2T hot salsa (on the side).

Traditional Power Bowl: less than a cup of sauteed kale w/ onions, 2.5 oz of lemon chicken, 1/4 cup black beans,  1/4 cup brown rice, 1/2 roasted zucchini, 1/2 cup roasted butternut squash.


Last up, I hard boiled eggs that I’ll have for snacks this week, par-steamed the sweet potatoes for tonight’s “street tacos,” and chopped up a few other veggie for lunches and  the pita pizza dinners I’ll alternate throughout the week.  I’ve never done meal prep quite like this, but I actually really enjoyed it.  I’m  glad I decided to add the variety to the power bowls, because I know myself, and I can’t eat the same thing for 7 days straight at lunch.

Since the dinners aren’t make-ahead, I’ll post pictures of those on IG and make sure to write a post with a photos from both meals later this week.

I have to admit, I was a bit nervous to start this plan, because it’s less protein and more carbs that I’m “supposed” to eat.   But I decided to take a chance and try it out because it’s super healthy, completely clean, very well balanced, and seems really satisfying.  Plus, I’m far enough along from my wls that I can eat a bit more normally (albeit much less).

Here’s to the start of a great week, and a fantastic month.

photo


Read Full Post »

Happy Monday! OMG – I am still excited about the game last night!  What game, you ask?  The West Coast rivalry between the SF 49ers and the Seattle Seahawks, of course! The game was back and forth the entire time, both teams playing at such a high level, and my stomach was in knots for about 30 minutes after it ended.  Luckily, my 9ers won!!!  In celebration, this was my outfit today:

2013-12-09 07.11.23

If you’ve taken part in FMM then you know the rules. If you’re new, please take a moment to answer this week’s question on your own blog then add your link in the comments section at: www.alltheweigh.com so we can all see your FMM questions and answers. Please invite your blog readers to add their links here too so everyone has to opportunity to be seen. The idea is to connect with other awesome bloggers so take a moment to post your own FMM post and comment on a couple of other posts. Now it’s time for this week’s topic!

FMM: Sharing a Favorite Holiday Recipe

This week Kenlie asked us to do something a bit different – she had made some amazing cookies (go check out her post – they look way too cute to eat!) and thought it might be fun to have us share our favorite holiday recipes.

My recipe is one I found last year on Skinnytaste.com – Baked Brie Phyllo Cups with Craisins and Walnuts. I made this recipe as an appetizer for Christmas Day last year, and everyone raved about it.  They had no idea that it was “skinny.” (Each tart is 60 calories – I’ll let you look at the original site for the full nutritional details).

What I love about the recipe is that there aren’t a ton of ingredients:

  • 3 oz light brie, skin removed, cut into 15 cubes
  • 4 tbsp craisins
  • 4 tbsp chopped walnuts
  • 2 tbsp honey
  • 15 Mini Phyllo Shells***

***These shells were the hardest part of the entire recipe. I had to go to three different grocery stores to find them, but I finally did.  So, I’d recommend not waiting until the week before Christmas to look for them (like I did last year).  They’re in the frozen section of your grocery store, so you can get them well ahead and keep them in the freezer).

The directions are simple:

Preheat oven to 325.

While you’re waiting for the oven to preheat:

  • place the phyllo cups on a cookie sheet
  • cut the brie into pieces
  • combine the honey, walnuts, and craisins in a bowl (this is sticky!)

Fill the phyllo cups with 1 piece of cheese, and then top with the walnut/craisin/honey mixture.  This was the “hardest” part of this whole thing, because the mixture is really sticky and it wasn’t easy getting it into the phyllo  cup without getting my hands dirty.

Once all the cups are filled, bake for 5-7 minutes.  Serve warm.  These are great reheated in the toaster oven the next day, if you have any leftover.  As you can see from my photo, I doubled the recipe – people will love these, so I highly recommend that you do the same.

2013-12-08 23.40.57

I love how festive they look, and believe me, they taste even better!

Now it’s your turn to answer the questions!   And also be sure to go back to Kenlie’s blog and leave a link to your FMM post in the comments!  I really encourage you to comment on as many people’s posts as you can – I’ve met some fantastic people through FMM.  You never know who you’ll meet today.

Read Full Post »

bilblcooksI found this recipe in the November issue of Self magazine, and knew I had to give it a try.  I made it tonight for my parents and sister, and they couldn’t stop raving.  The recipe takes a bit of prep, but it’s perfect to make when entertaining, because the actual cooking time is relatively short – less than 20 minutes.  Plus, your guests will be really impressed! It’s a hearty, satisfying meal that is perfect for fall and winter.

Nutrition Info:

portabello nutrition

2013-11-02 16.40.37

(Note: the original recipe called for chicken broth, but I didn’t include it in the dish I made because I didn’t think it needed it).

Preheat oven to 450 degrees.

First, clean the portabello mushrooms and remove the gills and caps.

2013-11-02 16.42.36

Place a piece of parchment paper on a rimmed cookie sheet.  Put mushrooms cap up on the cookie sheet. In a small bowl, combine the olive oil and balsamic vinegar, and brush half of it onto the mushroom caps.

2013-11-02 18.40.05

Bake for 8 minutes.

While the mushrooms are cooking, start sauteeing shallot/garlic/onion mixture with olive oil, salt, and pepper.  Add in rosemary.

2013-11-02 18.44.46 The kitchen will start smelling heavenly at this point.

Add cannelini  beans that have been drained and rinsed, cubed prosciutto, and parsley.  Cook for 5 minutes. Remove mixture from pan and set aside.  Add spinach to skillet and wilt, about a minute.

At this point, the mushrooms will be ready.  Flip them over so you can fill them.  Brush with remaining olive oil/balsamic mixture.  Add spinach.  Then fill with bean/prosciutto mixture.

2013-11-02 18.53.12

Combine panko breadcrumbs and cheese, and divide among mushrooms.

2013-11-02 18.54.08

Coat with olive oil spray and bake for 10 minutes.  The panko breadcrumbs will turn golden and the kitchen will fill with such an amazing aroma that your dinner guests will ask if it’s almost ready.  Tell them it will be worth the wait.

2013-11-02 19.07.06

It’s hard to believe that something that tastes this good and has this much flavor is only 265 calories!

Read Full Post »

bilblcooksI’ve been wanting to make stuffed peppers for a while, and since I had some bell peppers in the fridge and had just purchased quinoa yesterday, it seemed like tonight was a good idea. Although the quinoa has more carbs than I usually eat, I like the idea of enjoying it every so often. I checked out a few recipes, but most of them were more Mexican-flavored, so I did what my mom says good cooks do – made it my own.

Italian Quinoa & Turkey Stuffed Bell Peppers

Ingredients & Nutrition Info:

bellpeppers

20130714-183804.jpg

Preheat the oven to 400 degrees. While that’s going, get the quinoa cooking.

20130714-183816.jpgI used 1 cup of water for 1/2 a cup of dry quinoa. It takes about 10-15 minutes to cook, so while it was bubbling away on the stove, I got the turkey ready.

20130714-183911.jpg

Saute the onions in a bit of olive oil, salt, and pepper. Add garlic. Add turkey and cook until browned. Once the quinoa is ready, add that. Finally, add half of the pasta sauce and some fresh basil, and combine.

20130714-183842.jpg

In the mean time, while the onions and turkey are browning, cut two bell peppers lengthwise, and remove the stems and seeds. I placed a tiny bit of pasta sauce at the bottom of a lightly greased pan, just to insure the peppers wouldn’t stick/burn. Then stuff the peppers with the mixture. As you can see, they’re overflowing.

20130714-183926.jpg Add the cheese right before you pop them in the oven.

Over the pan with foil, and bake for 30 minutes. Remove foil and cook for an additional 5 minutes.

20130714-191625.jpg Look at how delicious and bubbly these look. The house smelled fabulous the entire time they were cooking, and I couldn’t wait for the timer to ding.

20130714-191637.jpg I ate 3/4 of the pepper, and the entire filling, but those of you who haven’t had WLS would probably want to have a salad or some other veggie on the side.  Or, you might eat two halves, if you really have an appetite.  Either way, enjoy – MANGIA!!

Read Full Post »

bilblcooksNow that I’m a post-op VSG person, I’m on the lookout for recipes that will allow me to keep eating the way I like to – well-balanced, healthy, whole foods. The best blog I’ve found for a post-surgery healthy lifestyle is The World According to Eggface. Shelly cooks the way that I like to, and so when I was looking for something new for breakfast, I knew I wanted to try Eggface’s Breakfast Bites. Like any good cook, I decided to make the recipe my own, and changed it up a bit. That’s one of the things I love about Shelly’s recipes – they’re very customizable. She gives you the main idea, and then you’re only limited by your own culinary choices.

Bella’s Eggface Breakfast Bites

Ingredients:

20130611-085601.jpg
bellabb

The only ingredient I didn’t list in MFP was the sage, which came straight from my sister’s herb garden. I really love that I can have pancetta and full-fat cheese and each bite only comes out to 40 calories!

Directions

Preheat oven to 350 so that it’s waiting for you, and not the other way around.

Since I was using pancetta, I knew that I wanted to cook that up first, so that I could use the drippings as the fat to saute the veggies. So I rendered the pancetta first, and then put it on paper towels to soak up some of the grease.

20130611-084549.jpg

My food processor came in really handy in chopping up the onions and crimini mushrooms. Once they’re chopped, saute them in the pancetta drippings left in the skillet.

20130611-084618.jpg

Once the mushrooms and onions are soft, add in the green onions (which I chopped by hand), as well as the pancetta. This way, all the flavors can meld.

20130611-084628.jpg

Take the skillet off the heat and allow those ingredients to cool a bit before adding in the egg and cheese.

20130611-084644.jpg

To make sure the muffins come out of the pan easily after they’re cooked, spray the mini muffin pan liberally with cooking spray. I used Trader Joe’s canola oil spray, but something like Pam would work well, too.

20130611-084657.jpg One tip I can give to make cleanup a breeze is to make sure to wipe off the excess spray off the pan itself. The same goes with any egg mixture that might drip on the edges of the pan as you fill it.

Bake the muffins for 30 minutes. While they’re cooking, you’ll see that they puff up and look like real bakery muffins, but as soon as you take them out, they deflate. The kitchen smelled amazing while these were baking.

20130611-084710.jpg

Eggface showed hers cooling on a rack, so I followed suit. I made sure to put some paper towels under the rack, just in case anything dripped.

20130611-084726.jpg I couldn’t wait to try these! Don’t they look delish?!

I stored all of them in a large container, separating each layer with paper towels. I shared mine with my sister and parents, so I didn’t need to freeze them, but I’m sure they would freeze up beautifully.

20130611-090756.jpg

20130611-092046.jpgTo reheat, I’d suggest the oven or toaster oven for 10 minutes. It’s worth the time it takes to wait for the oven to preheat because the bites come out warm and almost crisp. (So much better than the gumminess that would come out of the microwave).

20130611-092056.jpg I have three mini muffins plus some fruit for breakfast, and I’m satisfied for hours. Those with a normal-sized tummy will probably want to eat more, but at these nutritional totals, there’s no guilt. Enjoy!

Read Full Post »

This morning I had my two-week post-op appointment with the surgeon, and it was refreshing because it was the first time I had an appointment in the bariatric department when I wasn’t worried about making the weight loss requirement.  Unlike my previous appointments, I even had breakfast (a protein shake) prior to weighing in.

gold-starI got on the scale, and it showed 266, which is an 11 pound loss since the day of surgery.  (It also means that I’ve lost 49 lbs so far, so I’m hoping that a big, celebratory post will be in order tomorrow!).  Then they took my blood pressure, something that in the past has always been on the lower side of the high range.  Today it read 119/79, which they said is perfect!  I’m thrilled!!  They asked me a series of questions about my medication, my diet, my pain, as well as my overall feeling, and told me they were really impressed with how well I was doing.  That I was following everything to the letter, and that it showed.  (I felt like they were giving me a gold star, and being the girl who is the perfect student, that was amazing).

Then I met with the surgeon, who said that he was impressed with the way that my scars were healing, with my level of energy, and my general health.  He said I was a model patient!!  He answered a few of the questions that I had, and the entire appointment went really smoothly.

Today’s visit:

  • cleared me for driving!!
  • allows me to move on to more activities than just walking.  Bike, elliptical, and light weight training – here I come.  As soon as all my incisions completely close (2-3 days’ time), I can start swimming!!
  • moves me into Stage III foods!!!!

Stage III Foods

The exciting thing about Stage III foods is that it opens up a wide set of textures and tastes that make me feel like more of a normal person again.  I get to chew my food!  😀  On Stage III I can eat:

  • eggs (although I don’t think I’ll be partaking, since I’m not a huge fan)
  • deli lunchmeat, like turkey, chicken, and ham
  • soft fish, like tilapia, salmon (in moderation), etc.  (No shrimp yet, since those are firmer)
  • canned tuna and chicken
  • tofu
  • dairy: Greek yogurt, cottage cheese, string cheese, semi-soft cheeses (like gouda, mozzarella, etc).
  • all fruit!!  I have to peel the skin off of fruits like apples and pears, but otherwise, I can have all of them.  Pre-op I was limiting my fruit because of the carbs, but now that my portions are so small, I’m going to have fruit with most meals.
  • most veggies, well cooked.  (Stage 4 is where I can have raw veggies and greens, which I cannot wait for).  They did say to avoid overly fibrous vegetables, like asparagus.
  • hard crackers and well-toasted wheat bread
  • mashed potatoes

I can work with that!  I’m already thinking of fun meal plans. Today I kept things fairly simple:

6.3lunch

I can’t tell you how delicious the peach tasted!  And having crackers and tuna?  So  good!

6.3dinner

My veggies have to be “well cooked,” and since I really don’t like overcooked vegetables, I decided to grill the eggplant.  One small eggplant yielded enough for lunch and dinner for the next few days.

I can already tell that my grocery bill is going to go way down.  It’s going to take some getting used to not to overbuy, but I guess that’s all part of my new lifestyle.  I am definitely going to keep Eggface’s blog in my bookmarks, because she puts together food that looks so appealing (maybe because Shelly’s Italian, too, so we like the same foods?). In any case, I put one of her famous bentos on my Amazon wishlist, and I’m hoping I get it for my birthday.  If not, I’ll buy one before school starts, because it really is perfect for portion control post-wls.

Today was a great day, the whole way around.  Not only did I have a stellar appointment, but I am eating food I really enjoy, AND I got to spend the day with my dad.  He was kind enough to plant a bunch of flowers for me.  (See my IG photo —->).

Read Full Post »

bilblcooksCheesy Garlic Cauliflower Pizza Crust

I first heard about this recipe from one of the YouTubers I follow, VSGTanya. Her video gives step-by-step instructions. This recipe interested me because I’m trying to keep things low carb, and who doesn’t love pizza? This recipe does take time to prepare, but it’s definitely worth it.

Ingredients/Nutrition:

cauliflower crust

20130222-102925.jpg

The best thing about this pizza (and all pizzas) is that you can top it with whatever you like, so I’ll show you what I topped this with in a little bit.

Preheat oven to 450.

Cut cauliflower into florets and boil for 10 minutes.

20130222-103621.jpg

20130222-103652.jpg Drain cauliflower thoroughly.  The video emphasized how important it is to remove as much water from the cauliflower as possible.  I should have heeded this warning a bit more, because I think this is one of the reasons that my first attempt was softer than I’d have liked.

20130222-103724.jpg Rice the cauliflower.  Rather than a ricer, which I don’t have, I used my Cuisinart, which made quick work of it.

***After trying the recipe and realizing that the crust was too soft, I did a bit of research online and discovered a slightly different method for these first steps on Eating Bird Food, which I’ll use when I make this the next time:

  1. Rice the cauliflower in the Cuisinart.
  2. Sauté the cauliflower for 6-8 minutes in a nonstick skillet.  This seems like it would really help with removing the moisture.

20130222-105840.jpgIf you have a pizza stone, use it, because that will really help the crust get a bit crispier.  Since I don’t have one, I put some olive oil on a cookie sheet that I covered with foil (makes cleanup easier), then I added parchment paper. (The olive oil helps the parchment paper stick to the cookie sheet).  Then I used my Misto to spray a tiny bit of olive oil on the top of the parchment paper, too.  I had absolutely no problem with the pizza sticking.

20130222-103747.jpg The recipe called for for one riced up of cauliflower.

20130222-103803.jpg Combine the cauliflower, quattro formaggio (or shredded parm), light mozzarella, crushed garlic, 1 egg white, and spices.  I used Italian seasoning, dried oregano, cayenne pepper, red pepper flakes, and garlic powder (the title does have ‘garlic’ in it!).  I didn’t add any salt, since I’d salted the water I boiled the cauliflower in and the cheese can be salty.

Now comes the messy part: flattening and shaping the crust onto the sheet.  The recipe calls for the crust to be fairly thin, to aid with crisping.

20130222-103836.jpg

In terms of cooking time, the original recipe I was following said to cook it for 15 minutes at 450.  Because I felt it was a bit soft, I think I’d cook it for at least 10 minutes more next time (25 min).

Now let’s talk toppings: I used pizza sauce, jalapeño chicken sausage, and mushrooms, plus a bit more of both cheeses (a 1/8 cup of each, total).

20130222-103910.jpg

The possibilities are endless in terms of what you could top the pizza with.  Next time I’m thinking of bbq sauce, chicken, and purple onions.  I’d also love to try a veggie version one of these Fridays of Lent.

My finished product looked and smelled delicious!

20130222-103944.jpg

Other than the crust being softer than I’d like, it was simply delicious.  Definitely a better, lower calorie, lower carb version of something I love.  I ate mine “Italian style” with a knife and fork because the crust wouldn’t allow me to pick it up with my hands.  Reviews of the second method I mention said that the crust was strong/crisp enough to eat it by hand.

20130222-104009.jpg I ate 2 servings – 1/2 the pizza, and as I made it with my toppings, it came to 367 calories, 8g carbs, 23g fat (high because of the cheese), and 35g of protein.

I highly recommend this recipe with the second set of directions for the prep of the cauliflower.  I can’t wait to have the leftovers and to try it again.

Read Full Post »

bilblcooksOver my winter break, I was searching for on-the-go breakfast ideas that I could make ahead and quickly bring with me to school. I love smoothies, but when I’ve attempted to make green smoothies ahead of time, they turn out separated and awful. I went on Pinterest, and of course found the perfect answer: The Yummy Life’s Make-Ahead Oatmeal Smoothies.

4880With a photo like this, how could I help but check it out?

Definitely go to that link above to see all of the variations Monica offers. I used her Apple, Peanut Butter, and Cinnamon recipe as an inspiration for the one I’m going to share with you today. After making the original recipe that Monica posted, I made lots of little tweaks and came up with my own version.

The main differences between mine and the original is that I’m using almond milk and protein powder rather than Greek yogurt.  I also changed the amounts of the ingredients, to make the finished smoothie more to my liking.  Play around with it so that you get it the way you love it.

Ingredients/Nutrition: This will obviously vary depending on what you put into yours, and in what quantity.

20130110-080556.jpgoatmealsmoothie
You can use any spices you like, but I added cinnamon, nutmeg, and a dash of ginger.  I love that combination, especially with the flavors of apple and peanut butter.  (BTW, I know it looks like my oats came from Target, but that’s just the container I use to store the Bob’s Red Mill oats.

20130110-080700.jpgThose totals may seem a bit high in carbs/fat, but it’s also really rich in fiber (8.7g) thanks to the oats and the chia seeds).  This was the first time I’ve ever used chia seeds (I know, I’m late to the party), and I absolutely love the way they add a richness and thickness to the smoothie.  Some information says that they aid in weight loss because the fiber helps with a feeling of fullness, as well as blocking some fat.  I’m not sure about the fat blocking, but it definitely makes me feel super full after a smoothie, and that filling feeling lasts until lunchtime, which is great.

20130110-080834.jpg Another unique ingredient in my smoothie is Bee’s Knees.  I love Bee’s Knees Peanut Butter from Peanut Butter & Co.  It’s delicious, and I like the hint of honey that it offers.  I’ve found it at Sprouts and Whole Foods, but you can also order it online.

Whenever I make this smoothie, I make a double portion because that’s the whole point of “make-ahead” for me.

20130110-080745.jpg

Once you have all of the ingredients in the blender, just hit blend.  Because the ingredients like the oats and peanut butter might be a bit more difficult to mix well, you may need to stop and stir a bit and then re-blend.  Or, it could be that my Osterizer is just really old.

20130110-080757.jpg The finished product is fairly thin and watery, which is why you need to refrigerate it for at least four hours (better overnight) before eating it.  The oats and chia seeds need time to incorporate with the almond milk.  As they do, the mixture becomes incredibly thick and satisfying.  If you’re freezing it, as I do when I make a really big batch, the directions say to still put it in the fridge for at least 4 hours, and then transfer it to the freezer.

I specifically purchased the canning jars and plastic lids, because I like the idea of using glass rather than plastic for these smoothies.  It’s cleaner, better for the freezer, and they’re inexpensive for their quality.  Plus, they’re ALL OVER Pinterest, and since I know I’m never going to can anything, I wanted to get in on the fun.  I found mine at my local hardware store, but I know they’re on Amazon, too.

20130110-080820.jpg

I can’t tell you how much I enjoy this smoothie.  I love that it doesn’t have a smooth texture, thanks to the oats, and that I have to chew it as I enjoy it.  If you prefer less texture, you can pre-grind the oats and chia seeds in a nut grinder before you add them to the blender.

I also love that the combinations are endless. I can see using berries in the summer (instead of applesauce) and pumpkin in the fall, and bananas are great any time of year.  What combination do you think you might use?

Read Full Post »

Throughout the month of December, I’ll be participating in #reverb12: celebrating the successes of 2012, honoring the challenges of 2012, and planting the seeds for a rich and rewarding 2013. December is the perfect time to reflect on the year that has passed and start to manifest dreams for the new year.

Day 15 – What was the most extraordinary dish you sampled in 2012? What made it so magical? It needn’t be the most extravagant dish, just the one that knocked your socks off with its flavor, texture, aroma, freshness, color, significance, timing… whatever. Relive the magic and help us savor it with you here.

The best dish I created in 2012 was the evening I had my parents and sister over for a seafood feast.  I indulged on the ingredients, but it was worth every penny to experience their enjoyment of the meal.  Here’s a repost of my original one:

Originally posted on August 28, 2012, as part of a #WIAW post.
It all started when I saw this lobster salad recipe on Skinnytaste. I’ll get into the details of that meal later, it’s a good one. Ever since school started I’ve been in the mood to try new recipes. Summertime is always really laid back, and I go with the flow in terms of recipes. Now that school’s back in, I find myself craving the creative outlet that trying new recipes gives me. It’s strange, you’d think that I’d do more innovative cooking in the summer, when I have nothing but time on my hands, but I guess I like to keep it flexible, even with cooking.

First up is a delicious baked crab cake recipe from Skinnytaste. (Can you tell I love her site?) I tried the recipe out earlier in the week, because it was my first time making it, and I didn’t want to serve it to my parents and sister at Saturday’s dinner party without trying it first. I modified the recipe just slightly, and although mine don’t look half as appealing as hers, they tasted great.

20120828-201004.jpg

The diner party was designed around Skinnytaste’s Chilled Lobster, Sweet Corn, and Tomato Salad. There’s quite a story behind making this dish, but I’ll save the details for the actual Bella Cooks blog post. One thing I will say is that this is one time that living on the West Coast puts me at a disadvantage. Lobster is expensive here – two lobster tails were $50! But my family is worth the splurge, and the salad tasted so fresh and healthy that it was well worth it.

20120828-200936.jpg

I wish this photo wasn’t blurry, because the dish really looked gorgeous.

I wanted to start off the dinner with a nice accompaniment, and my sister actually suggested an avocado salad. I searched, and found this Chilled Avocado Soup on EatBoutique. This was the surprise hit of the evening. Everyone raved about it, and I agree. I’ll absolutely make this again. I don’t like cilantro, so I substituted Italian parsley, and it was simply divine. And it only took about 15 minutes to put together!

20120828-200950.jpg

Here’s a shot of the seafood feast. One of my FB friends said that this angle makes it look like you’re sitting with us at the table, so I thought I’d include it. My mom, who is an amazing cook in her own right, was incredibly impressed by my planning and execution, and I think she was really touched that I put in all this effort for my family.

20120828-201030.jpg

Read Full Post »

Today’s recipe comes courtesy of Gina @The Fitnessista. If you haven’t checked out her blog, make sure you do! Not only is she a Zumba instructor, she’s a young mom, military wife, and all around healthy-living guru. I’d been on Gina’s site many time and read about her famous breakfast cookie. It wasn’t until school was starting and I needed a make-ahead, protein-packed, stick-to-your-ribs kind of breakfast. I loved my green smoothies throughout the summer, but let’s face it, you can’t make them the night before, and I need every precious moment in the morning on weekdays. So, after reading many rave reviews, I decided to give the Breakfast Cookie a try.

The Fitnessista’s Breakfast “Cookie”

Nutritionals: Because the cookie ingredients can vary so greatly, the numbers will differ, but for the one that I made in these photos:

Ingredients: This is where you can customize it to your liking. There are so many possibilities that this same base recipe could be eaten every morning for breakfast and never get tiresome. Monday night I made the cookie with canned pumpkin (instead of banana) and pumpkin pie spice (instead of ginger) and it was delicious.  Seriously, the combinations of flavors and add-ins with this is endless.

20120820-214011.jpg

1/3 cup oats
1/8 cup unsweetened vanilla almond milk
1 scoop BSN Lean Dessert, Cinnamon flavor
1 TBSP nut butter of your choice (I used pb)
1 banana, mashed
cinnamon, nutmeg, and ginger to taste

  • The original recipe called for stevia, but since the protein powder I use is sweetened, I left it out.  Again, know your ingredients and add the right amounts to suit your tastes.
  • The original recipe also called for a dash of sea salt to brighten the flavors, but I find that my pb has plenty of salt already.  Modify  this for your diet and tastes.
  • I was really thrilled to see the cinnamon in this recipe, because it meant that I finally found a use for the cinnamon-flavored protein powder I bought and decided wasn’t great for smoothies.  It’s IDEAL for this type of recipe.  (I bet it would be great in a protein pancake, too).

Directions: This recipe really couldn’t be simpler, but just in case you’d like a step-by-step, here goes.

Mix all dry ingredients in a bowl. Stir so that the spices are well

20120820-214021.jpg

oats, protein powder, cinnamon, ginger, nutmeg

Add the peanut butter (I forgot this step until the end, which is why my photos don’t quite match up) and incorporate with the dry ingredients until crumbly.

Add in almond milk.

Next add mashed banana (or canned pumpkin, or applesauce, etc).

20120820-214028.jpg

20120820-214034.jpg

The pb that I’d forgotten in the earlier step. It doesn’t make a huge difference when you add it, as long as you have it in there.

Empty “cookie dough” onto an appetizer-sized plate and smooth out with the back of a spoon until it looks like a large, thick cookie:

20120820-214041.jpg

It already looks great, doesn’t it? Yum!!

20120820-214047.jpg Cover plate with plastic wrap and leave in fridge overnight.  Doing this allows the oats to soften and the spices to become fully potent.

The finished product looks much like the pre-refrigerated cookie, so I didn’t take another picture (well, that, and it won’t be “done” until the morning and I wanted to write this up Monday night).  The cookie doesn’t really harden, but remains gooey.  Definitely something to eat with a spoon or fork.  The idea of eating a cold mass of ingredients may not sound appealing, especially on a crisp morning, but one taste and you’ll see just how delicious and satisfying it is.  I haven’t tried heating the cookie up in the microwave, but I’m sure you could for 20-30 seconds, any longer and it might get really runny.  I just left mine out at room temperature for about 20 minutes before eating it, while I was still getting ready.

The “cookie” kept me satisfied for HOURS!  I ate it at 6:45 and it held me through lunch at 12:15.  That’s the staying power of 30g of protein along with some good carbs.

I enjoyed the cookie so much that I plan on eating it most weekday mornings throughout the school year.  Try it, I think you’ll really like it.

Read Full Post »

Older Posts »